Question
Question: Column-I | Column-II --- | --- (A) Between O and $F_1$ | (p) Real (B) Between $F_1$ and $2F_1$ | (q)...
| Column-I | Column-II |
|---|---|
| (A) Between O and F1 | (p) Real |
| (B) Between F1 and 2F1 | (q) Virtual |
| (C) Between O and F2 | (r) Erect |
| (D) Between F2 and 2F2 | (s) Inverted |
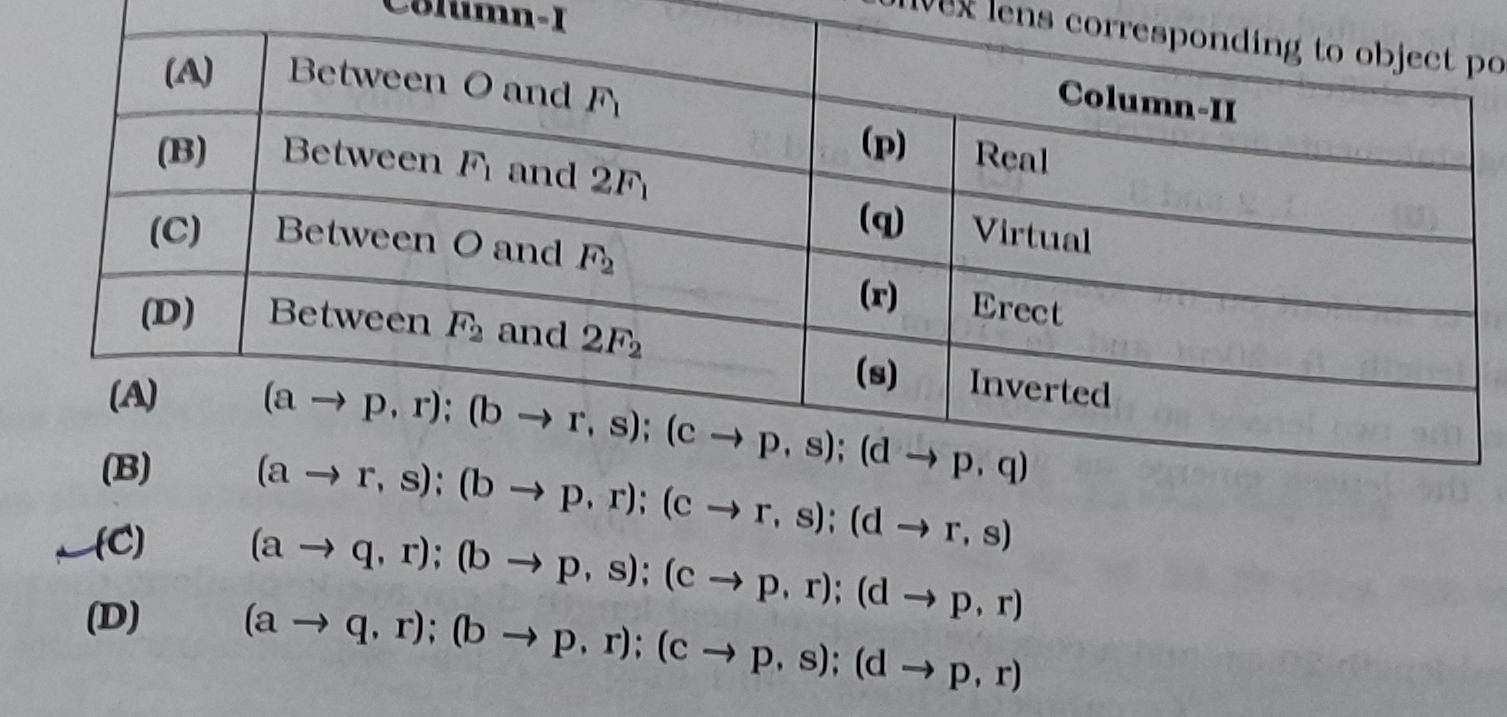
(a→p, r); (b→r, s); (c→p, s); (d→ p, q)
(a→r, s); (b→ p, r); (c→r, s); (d→ r, s)
(a → q, r); (b→p, s); (c→p, r); (d→ p, r)
(a→ q, r); (b→ p, r); (c→p, s); (d→ p, r)
C
Solution
The question asks us to match object positions relative to a lens with the nature of the image formed (real/virtual, erect/inverted). The notation F1, 2F1, F2, and 2F2 suggests a convex lens, where F1 and F2 are the principal foci on either side, and 2F1 and 2F2 are points at twice the focal length on either side.
Let's recall the image formation rules for a convex lens:
- Object between Optical Centre (O) and Principal Focus (F): The image formed is Virtual, Erect, and Magnified.
- Object between Principal Focus (F) and 2F: The image formed is Real, Inverted, and Magnified.
Now let's apply these rules to the given conditions, assuming a convex lens and that F1 and F2 are just the focal points on the two sides of the lens (the image formation rules are symmetric regardless of which side the object is placed on).
(A) Between O and F1: This corresponds to the object being placed between the optical center and the principal focus. According to rule 1, the image is Virtual (q) and Erect (r). So, (A) → (q, r).
(B) Between F1 and 2F1: This corresponds to the object being placed between the principal focus and 2F. According to rule 2, the image is Real (p) and Inverted (s). So, (B) → (p, s).
(C) Between O and F2: This is analogous to case (A), as F2 is just the focal point on the other side. So, the image is Virtual (q) and Erect (r). Thus, (C) → (q, r).
(D) Between F2 and 2F2: This is analogous to case (B). So, the image is Real (p) and Inverted (s). Thus, (D) → (p, s).
Based on our analysis, the correct matching should be: (A) → (q, r) (B) → (p, s) (C) → (q, r) (D) → (p, s)
Now let's examine the given options:
(A) (a→p, r); (b→r, s); (c→p, s); (d→ p, q) - Incorrect. (B) (a→r, s); (b→ p, r); (c→r, s); (d→ r, s) - Incorrect. (C) (a → q, r); (b→p, s); (c→p, r); (d→ p, r) - Let's check this option. - (a → q, r): Matches our derivation for (A). - (b → p, s): Matches our derivation for (B). - (c → p, r): This implies Real and Erect. For a single lens, a real image is always inverted, and a virtual image is always erect. Therefore, a "Real and Erect" image is physically impossible. This indicates a potential error/typo in the option. - (d → p, r): This also implies Real and Erect, which is impossible.
(D) (a→ q, r); (b→ p, r); (c→p, s); (d→ p, r) - Incorrect for (B), (C), (D).
Although option (C) contains physically impossible image characteristics for (C) and (D), it is the only option that correctly matches the first two fundamental cases (A) and (B) for a convex lens. In multiple-choice questions with potential errors, one must often select the option that has the most correct mappings. Given that "Real and Erect" is impossible for a single lens, there is definitely a typo in the option for (C) and (D). However, since (A) and (B) are correctly identified, this is the best possible answer among the choices.